Wednesday, September 14, 2011

Blogging and Bombing

I haven't blogged in a long time. No excuses. You've heard them all.

Instead I'll show you a few projects I've made in the last several months.

Socks (pattern and yarn details here):


A hat made with chunky Rowan wool and embellished with felt bird, crocheted leaves and some beads (nitty gritty details here):


Up close to see the beading better:


Cheerfully modeled by my little girl.


YARN BOMB!!!

You may be asking, "What's a yarn bomb?"

Also known as yarn storming, guerrilla knitting, and knitting graffiti, yarn bombing is a type of street art which involves knitted or crocheted work embellishing the environment around you. It is not an act of vandalism. It is an attempt to encourage folks to see their environment in a different light and to add a little whimsy to our everyday, humdrum existence.

I had never participated in any form of yarn storming, but one of the Nerd Wars challenges for the month of March encouraged such nefarious activities.

First, to find a good spot.

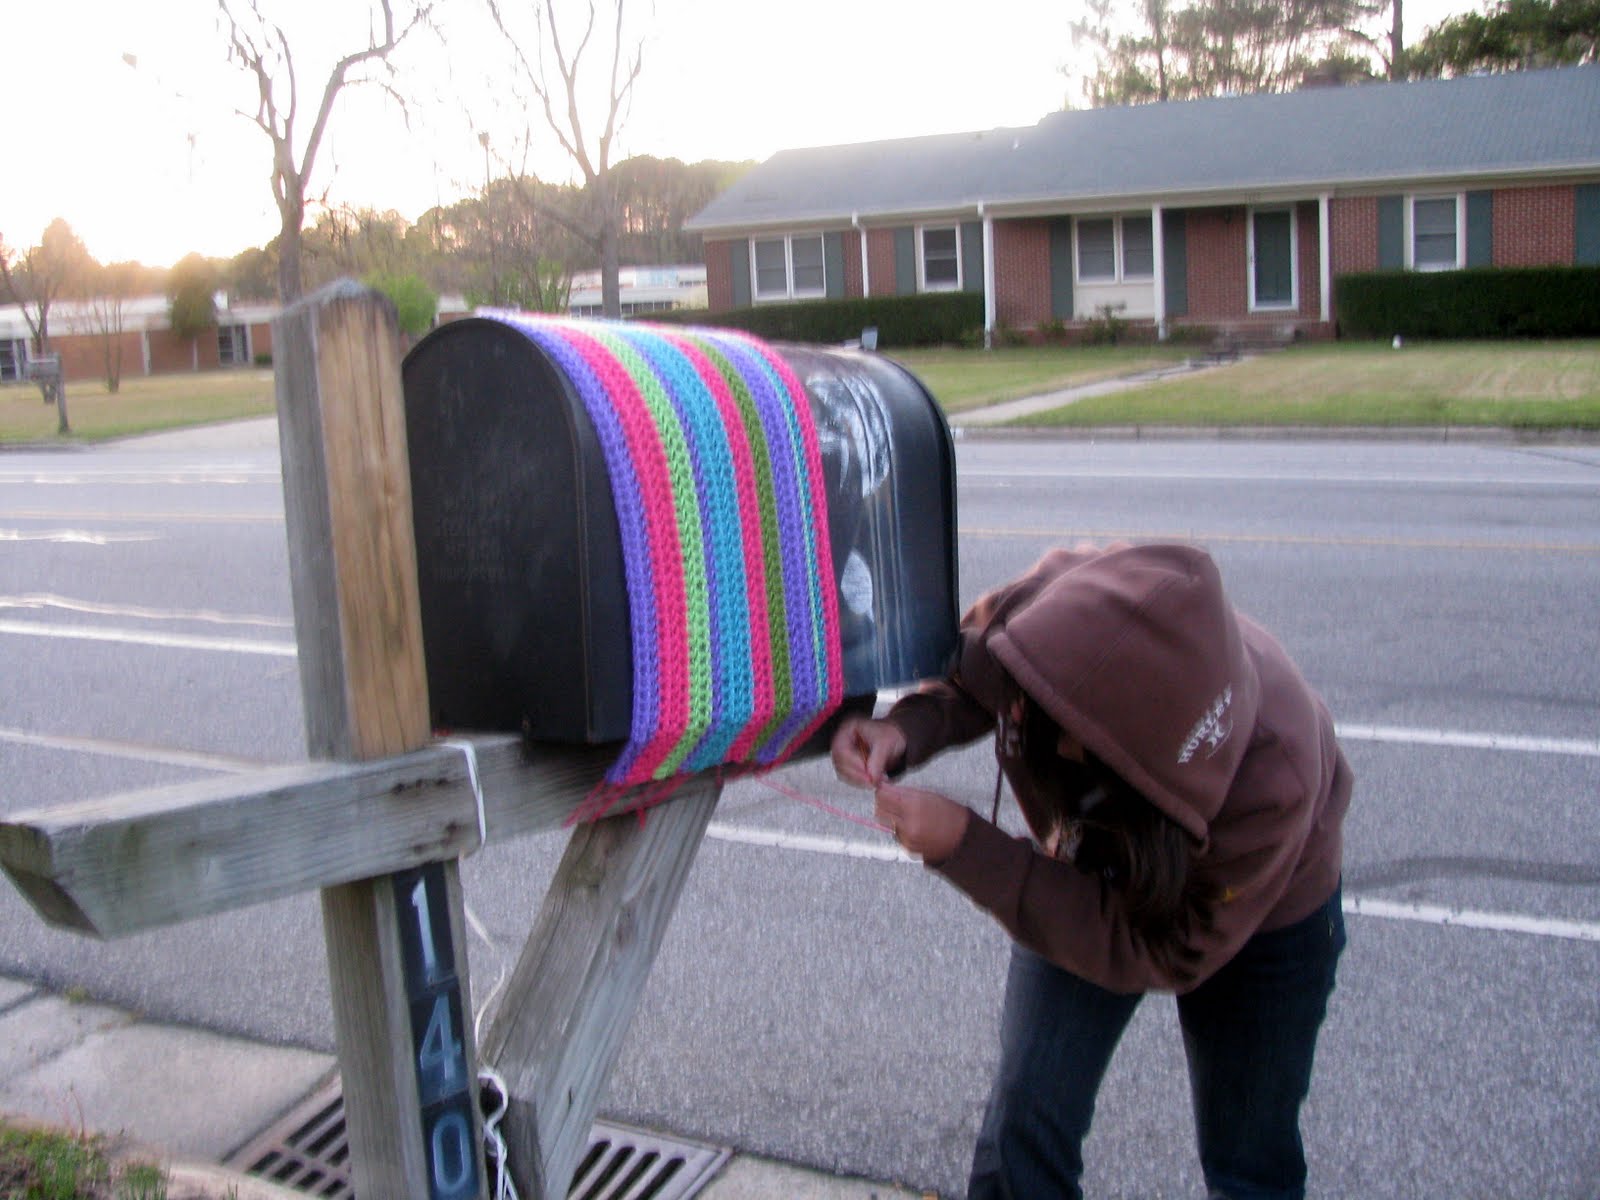
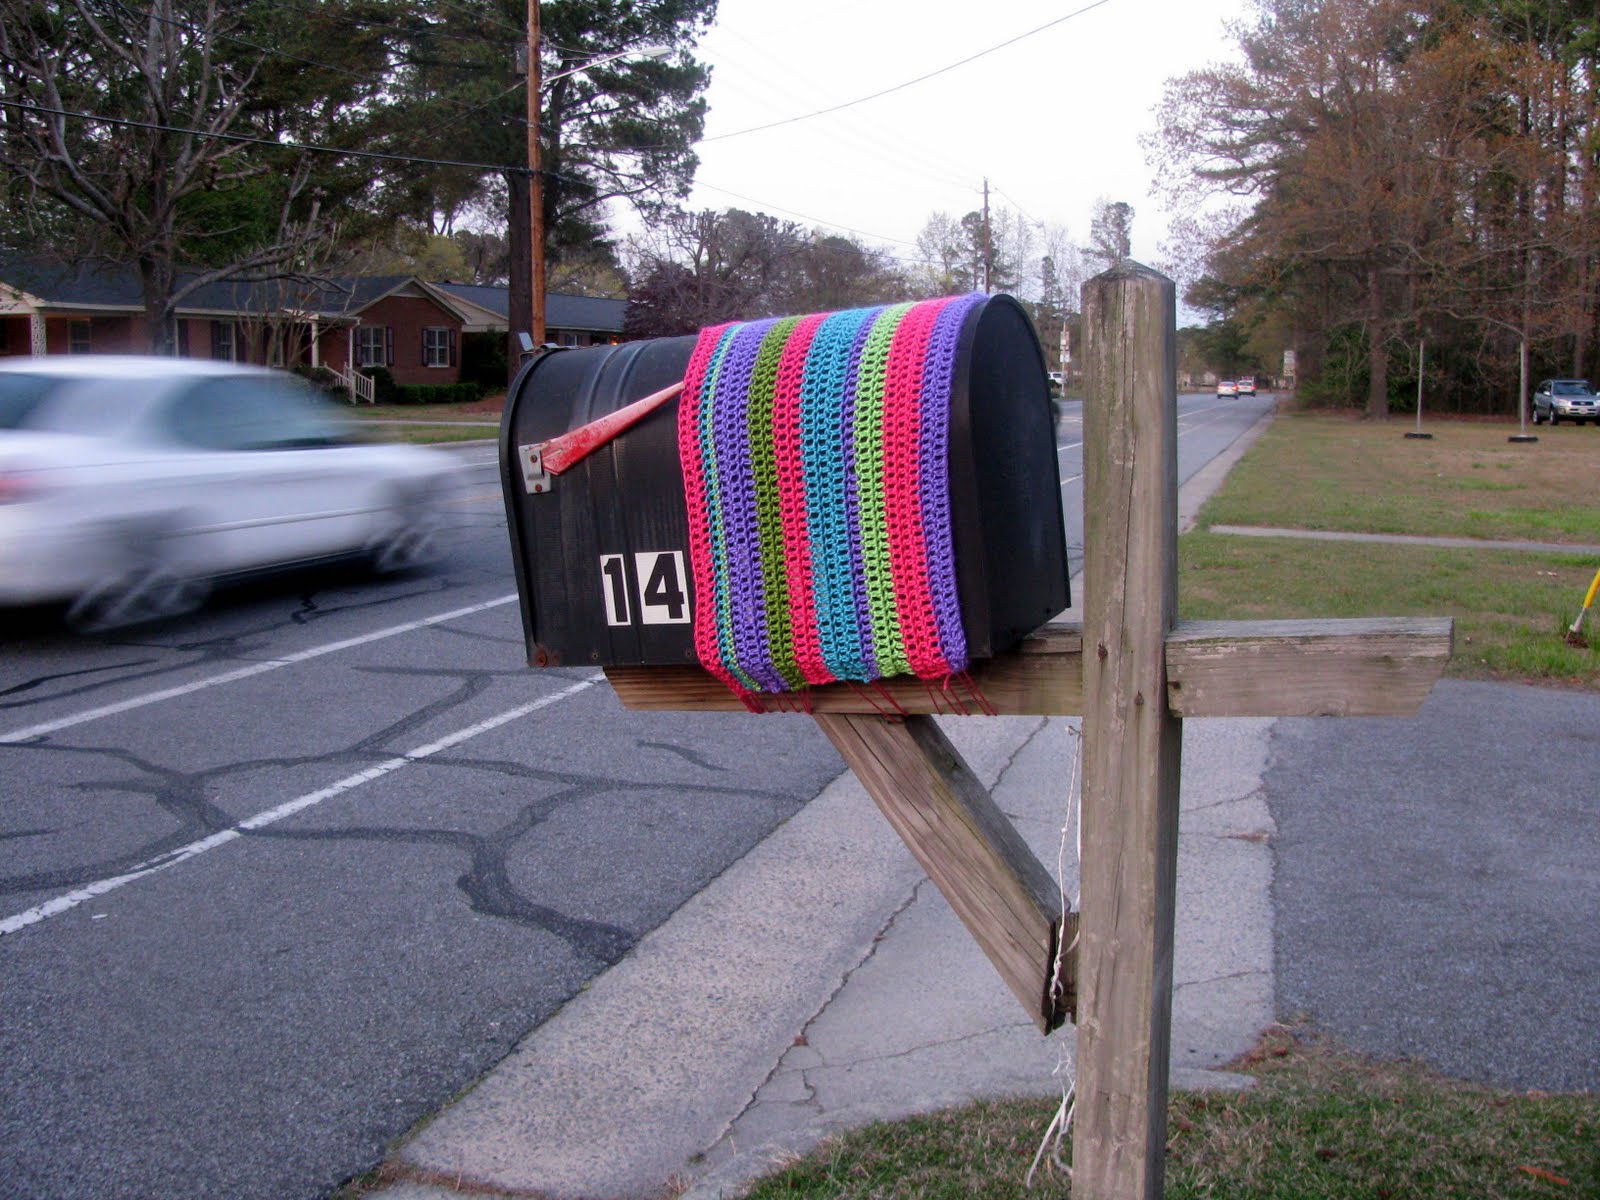
Aha! That sad looking mailbox at our local Music Academy looked like it could use some perking up. Bonus points for the fact that it sits across the street from a middle school where there is plenty of traffic.

Next, I armed myself with crochet hook and lots of colorful acrylic yarn and started hooking.

Then, it was time to practice my nefarious ninja skills.


When yarn storming on private property it is always a good idea to get permission first, but if you don't want to ruin the surprise, leaving a note explaining your art is an acceptable option.


Give a quick glance to admire your handiwork then quietly disappear into the shadows like any self-respecting ninja would do.


Find yourself grinning with glee every time you pass that way again and spot your colorful addition to the community.

(Yes, over 5 months later, it's STILL there!!!)

And that, my dear friends, brings you up to date with my crafting deeds through the month of March. Stay tuned for more to come!

Look, Rae! I blogged!

Wednesday, March 09, 2011

Productivity


I've been a busy gal lately and done a LOT of things. However, blogging isn't one of them!

Here is an update with lots of pics for your viewing pleasure. Most are projects that I started and finished in February. Click on name of each project to view the knitty gritty project details.

Nebula Wrap.


I started and finished a sweater for my hubby in February using Elizabeth Zimmerman's Seamless Saddle Shoulder Pullover pattern in her book Knitting Without Tears.

I call it "Beloved."


I have to say I am so happy with how it turned out.


This sweater was not without it's trials and tribulations.


There was some spinning in February. I spun alpaca...


...and some wool...


...and plied the two together.


There were smaller, less ambitious projects too. I crocheted a few water bottle covers to help my daughter with her AWANA missions project. She is making them to give to folks in exchange for donations which will all go to support children's programs in Nepal.


St. Patrick's Day is coming! I decided to make a crocheted Shamrock Garland.


This month, in anticipation of a little spring cleaning, I tried out two different patterns for Swiffer covers.


On the left is the Reversible Swiffer Sock and on the right is the Crochet Biffer Shrug.

Currently there are socks on one set of needles and and a cabled sweater in progress as well. However, I've spent the last two days doing a little sewing. I designed my own pattern for a reversible project bag.

This one is prize for a fellow participant in Ravelry's Nerd Wars. Her favorite colors are jewel-toned blue and green.


I made another one to donate as a door prize at Camp KIP in April.


I definitely see more of these bags in my future. I've really enjoyed sewing them!

Well, that pretty much sums up what I've been working on the last month or two. As you can see, my hands have been pretty busy! Now, if I could just be more consistent about writing my blog!

Wednesday, January 19, 2011

Swirlicious


Knitted cloth featured in yesterday's tutorial. Finished, but not blocked.

Do people bother blocking out their knitted dishcloths/washcloths??

Tuesday, January 18, 2011

TUTORIAL: I-cord or "Belly Button" Provisional Cast-on for Circular Knitting


When knitting something circular in shape, the initial cast on can be a bit fiddly. Working those first stitches with no knitting on your needles to manipulate can be a challenge. One solution is a variation on a provisional cast-on. You knit an i-cord out of waste yarn first and then drop the waste yarn and pick up the project yarn and start knitting your the pattern right on to the i-cord. Later, you remove the i-cord.

An online friend had some questions about the technique and I wanted to help her. This is my first-ever attempt at making a photo tutorial, so bear with me. Comments and suggestions are welcome.

For my demonstration I am knitting the Swirl Cloth, a circular dish cloth (or wash cloth) pattern available for free. Dishcloths are a great way to try out new techniques.

To start, take some waste yarn and knit a short length of i-cord. Your waste yarn should be a contrasting color from your project yarn. If you do not know how to knit i-cord, I highly recommend the video tutorial found on this page at KnittingHelp.com. I am using double pointed needles (DPN's). If you are not familiar with using DPN's, you can find a video tutorial here. The white kitchen cotton in my photos is my waste yarn. The blue yarn is my project yarn.

Since the pattern I am knitting calls for a cast-on of 8 stitches, I knit my i-cord with 8 stitches. This does not yield an attractive i-cord, but don't worry. It doesn't have to look good since it is only temporary and will be removed.

This is what it will probably look like after you have knit a few rows of i-cord.


The next step is to divide your stitches evenly over 3 or 4 needles. My DPN's came in a set of 5, so I chose to use 4 needles.


Now, drop the waste yarn (mine is white) and start working with the project yarn (mine is blue). Be sure to leave a decent "tail" on the working yarn because you are going to need it later. There is is nothing complicated about this step. You just pick up your project yarn and start knitting with it instead of the original waste yarn.


The first row you knit with your project yarn will essentially take the place of your cast-on row. My pattern tells me to cast-on 8 stitches, then knit around one time. So I knit a second row of 8 stitches in the blue. At this point, my pattern suggests putting a marker between each stitch, but you can imagine how incredibly fiddly and difficult that would be with only 2 stitches per needle...markers flying everywhere! So I will wait a few rows before adding the markers.

The pattern is very simple. It is just a repeat of the following two rounds:

*Knit to marker, yarn over, slip marker* for one round.
Knit next round.

Easy peasy, right? Well, not exactly at the beginning. That would mean on each needle for the first round of this stitch pattern I would have a k1, yo, k1, yo, then on to the next needle. Personally, when working with DPN's I do not like ending with a yo before before changing needles.

My solution is simple. On needle 1 I do the following: k1, yo, k1. But I stop there. Instead of doing the second yo after the second knit stitch on that first needle, I will do it at the beginning of the next needle. In other words while needle 1 has a k1, yo, k1 on it, needles 2,3,and 4 will have yo, k1, yo, k1. When I get back around to needle 1, I will start with the final yo of the previous round.

Below you can see me making a yarn over prior to knitting the stitches on one of my needles.


Now that I have more stitches on my needle, I decide to add the stitch markers. The pattern for doing so will be as follows: knit one stitch, knit the yarn over made in the previous round, place marker. Repeat.

Here is what it looks like from one angle.


And here it is flipped. You can see why some folk call this a "belly button cast-on." It looks like your project has a knitted umbilical cord attached.


Continue knitting in the round until you are ready to remove the provisional i-cord. You can wait until you finish your project or you can do it sooner.

Take the tail of project yarn from your cast-on and thread it through a darning needle. (I am using a CHIBI needle by Clover. They have a bent tip that helps in picking up stitches.) You are going to weave the tail through each of your first 8 stitches that you made in when you started knitting with your project yarn. If you are a really brave soul, you can remove the provisional i-cord first and then pick up your stitches. Because I am not fond of dropped stitches, I choose to pick up the stitches first, then remove my waste yarn.


You are going to do this all the way around, picking up each of the 8 stitches.


Here is a close-up showing where I put my needle. See the "v" of white yarn with two strands going into a loop of the blue. That is what you are looking for.


When you have gotten all the way around and you are certain you have all your stitches picked up, you can start removing the provisional stitches made by the waste yarn. If you need to snip it with scissors, please, PLEASE be very careful! It is very easy to accidentally cut your working yarn. I just used the tip of my CHIBI needle and gently pulled the white yarn out, snipping it's tail short to make removal easier.


Here is what it will look like as you begin to remove the waste yarn:


And now it is all gone. Do you have a gaping hole? Don't panic!


Take your darning needle with the tail and carefully thread it through your each of your picked up stitches again.


Gently, but firmly tug on that tail and draw those stitches together until your hole is all gone.


Give yourself a nice pat on the back. You've learned something new, and look at how tidy the center of your circular knitting is!


Be sure to securely weave in that tail on the underside of your knitting.

Monday, January 17, 2011

A Place of My Own

Hello! Would you like to come sit a spell in my little haven? Come on through the dining room.


It's just a tiny little den, only about 11 ft. x 11 ft., but it has great light, especially in the afternoon. I want to come up with a clever name for my room, but for now I'm calling it "The Stitchery."

Come on in! Be sure to take a moment and admire my son's photography hanging on the wall. If you care to sit, there's a comfy rosewood rocker. It belonged to my grandmother and I'm rather fond of it.


Or perhaps you'd like a little tour first?

Except the paint on the walls and a few $3 baskets I found on clearance after Christmas, there is nothing new in my craft room,. Rather, it has been cobbled together with bits and pieces gathered from other rooms in my house (and our attic!)

You'll find that I've filled my room with an odd assortment of things that I love. Standing beside the desk there is an old wooden valet that belonged to my dad, perfect for holding my quilt (or other sewing projects) in progress. For as long as I can remember, this valet stood in my parent's room by Dad's dresser. He would drop his change in the tray, drape his clothes over the top and set his shoes at the bottom. I think he would be happy to know his valet is still cared for and appreciated.

It's great having windows over my desk...a perfect place to sit and watch the snow fall last week.


Before it became The Stitchery, this room held much of our library with 4 bookcases FULL of books from floor to ceiling, and my crafting supplies were kept in a small bedroom; but whenever college boys came home, I was kicked out of my craft room!

Last month, before the Christmas break madness ensued, I determined to make the craft room the library/den and the library/den my craft room. As if switching rooms wasn't chaotic enough, I decided to go ahead and paint too. Below is a "before" picture where you can see the former color of this room. You can also see the back door situated on the west wall. It is immediately to the right of the windows and my desk.


It was out with the gold and in with the blue!


As you can see above, painting paneled walls takes a lot of extra brush work.

The new color is Benjamin Moore's Buxton Blue which seems to be quite popular lately. I'm not one to follow trends and at first I seriously resisted using this color. However, every time I considered paint colors, the Buxton Blue just made me happy. So I decided in spite of what others were doing to follow my heart and use what I like...even if it IS in every other home in America!


Now, when I sit at my desk and look to my right, this is what I see:


The pictures on the wall are drawings my youngest daughter made with oil pastels when she was about 6 years old. I've kept them because their whimsy makes me smile every time I look at them. I'm so glad to finally have a place to hang them where I can see them every day!


Decorating this room can be a challenge. It is FULL of doors! Six, to be exact. There is the door to the dining room, a closet door, a bathroom door, two bedroom doors and our back door which goes outside! As you can imagine, there is a decent amount of traffic through this room, so I had to arrange things with care. Blocked walkways are not allowed.

There are two tall shelves to hold much of my sewing and knitting stash.


The sun was really strong when I snapped these photos. Here's another view with slightly less glare.


The east wall opposite my desk is quite small (remember that closet door and bathroom door?) but it's a perfect spot for my vintage Singer Featherweight sewing machine which was a gift from my aunt. With a little work (new belts and power cord) and a tune-up, it is now in working order. It is both beautiful and useful.


Above the Featherweight are more things I love...vintage jars full of my mother's button collection, a self-portrait by one of my sons, some old toys that belonged to me and my hubby. The blue velveteen rabbit is filled with sawdust and missing an ear. I loved it so much when I was a wee one! The corduroy teddy bear sitting below was sewn by my grandmother. She also made the doll in red. Sewn with love and care, her sweet face is hand-embroidered. Candlewicking adorns her pinafore and hand-tatted lace made by my great aunt trims her pinafore and bloomers.


There is another small wall space located in the tiny hall area between the two bedrooms. This shelf holds my scrapbooking supplies as well as other are supplies. On top is a borrowed drum carder and the red cardinal I cross-stitched for my mother when I was a girl. Red is my favorite color and I have tried to add little pops of it all around the room.


Below, you can see more red accents on this shelf. Notice the cute white baskets lined with red striped fabric? I was thrilled to find them on clearance after Christmas. They are perfect year-round for my room!


As I said before, this room is quite small, and you've probably noticed that the ceilings are rather low. I am trying very hard to keep it tidy and uncluttered...clutter makes me feel unsettled. Sadly, there was no room for my dress form. But if you look carefully in the upper left hand of the next photo, you can see her standing watch in the corner of the room that is now our library. She's close at hand if I need her.


My beading supplies and my needlepoint wools and canvases also reside in the library to keep my dress form company. When sewing I set up the ironing board in that room as well. It is nearby for pressing seams, but out of the walkway.

Well friend, I guess that wraps up the tour. Do sit down and make yourself comfy. Feel free to get started on your needlework while I go put on the kettle for a pot of tea, or would you prefer coffee?

LinkWithin

Related Posts with Thumbnails